Example: Printing A
Poster For A Child's Room
- I decided on a "dolphins in space" theme for the
poster.
- I used "Image Search" ( http://www.google.com/imghp ) and entered the two words "dolphins
space", without the quotes, in the search text box. I also
selected "Large images" from the "Images Showing" combo box at the
upper left.
 I decided to use the first image that came up in
my search, two dolphins in space orbiting a globe. The image at
the time was on the web page at URL:
http://g-e-r-a-r-d-o.spaces.msn.com/PersonalSpace.aspx
I decided to use the first image that came up in
my search, two dolphins in space orbiting a globe. The image at
the time was on the web page at URL:
http://g-e-r-a-r-d-o.spaces.msn.com/PersonalSpace.aspx
Note: I was using Netscape 8.0.4 and I had to use a small combo box at
the lower left corner to choose "Display like Firefox" to get the
images on the page to appear.
- I scrolled down the page until I got to the dolphins
image.
- I held the left mouse button down and moved the mouse
to select the dolphins image. This allowed me to print only the
dolphins image and not the rest of the web page. If I had printed
the entire page, it is possible the dolphins image would have fallen at
a page break, and Netscape would have printed the image on two separate
pages, in which case I wouldn't have been able to make my poster.

- I selected "Print ..." from the "File" menu,
and in the "Printer Name" combo box selected my poster printer (here
shown with the name installed by default).
- I chose "Selection" in "Print range".
- I clicked the "Properties..." button at the
top right.
 In the combo box labeled "Printer on which
output will be printed" I selected a Cannon iP 4200 printer, which
happened to be connected to my machine across a LAN.
In the combo box labeled "Printer on which
output will be printed" I selected a Cannon iP 4200 printer, which
happened to be connected to my machine across a LAN.
- I clicked the "Configure" button and:
- Made sure color printing was selected
- Chose high print quality
- The image I want to print seemed to get
cropped when I printed to portrait orientation, so I chose to print in
landscape orientation. At this stage, the goal was to get the
image to initially print to a single output page -- so if necessary I
would have chosen as large an output page size as was required.
- I clicked "OK", and then clicked "OK" again in the
print dialog.

- The Poster utility came up initially as shown on
the left (after I clicked on the page in the window -- that selected
the page and caused the rulers to be drawn).
- I clicked on the "Original" tab towards the top
left.

- In the original tab window I performed a series
of steps, using the selection tool (the four-cornered box at the middle
right), to select a rectange that had just the dolphins image, and none
of the white space from the surrounding page, for my poster image
- I usd the hand tool to move the page until
the dolphins image was centered in the viewing window.

- I used the zoom tool, at the upper right, to zoom
in until the dolphins image almost filled the view window.

- I used the four-cornered box selection tool to
draw a dotted rectangle around the dolphins image. After I
released the left mouse button the rectangle became a four-cornered box
as shown at the right.
- At this scale I couldn't make my selection
perfect. I chose to zoom in and get the selection more exact
(this is optional):
 I used the hand tool to move the upper left
corner of the dolphins image to the center of the view window, and
then used the zoom tool to zoom in as far as possible.
I used the hand tool to move the upper left
corner of the dolphins image to the center of the view window, and
then used the zoom tool to zoom in as far as possible.- You can see I left some white space around the
dolphins image in my selection.
- I used the hand tool to grab the black square at
the upper left corner of the dolphins image, and moved it until the
inner sides of the selection box fell more exactly at the edges of the
dolphins image.
 Now you can see the top and left sides of the
selection box are more exactly positioned at the edges of the dolphins
image.
Now you can see the top and left sides of the
selection box are more exactly positioned at the edges of the dolphins
image.
- I zoomed out, moved the bottom right corner of
the dolphins image to the center of the view window, and repeated this
procedure for the bottom right corner of the selection box.

- I clicked on the poster tab at the upper left.
After step 14, the poster image was now be an enlargement of ONLY the
dolphins image, without also enlarging part of the white space
around it.
- I decided I wanted to make a poster about three
feet wide (or high), and so I clicked on the small "up" arrow next to
the poster zoom tool at the middle left.
- I chose a size such that the text at the lower right
told me the the width or height of the poster image was at least three
feet, and such that the
dolphins image nicely filled the output pages, without a lot of white
space at the edges.
 After choosing the final size for my poster, it
appeared in the poster utility as on the right.. It used 16
pages, 4 wide and 4 high, in landscape
orientation.
After choosing the final size for my poster, it
appeared in the poster utility as on the right.. It used 16
pages, 4 wide and 4 high, in landscape
orientation.
At the lower right I could see the poster image width would be 3.39
feet
wide and 30.49 inches high, for a total magnification factor of 692
percent of the original dolphins image.
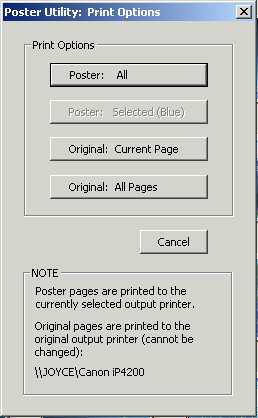
- To print the poster I clicked on the "Print ..."
button at the bottom left, which brought up the "Print Options" dialog
shown at the left. I then pushed the top button, "Poster:
All" to print the entire poster out.
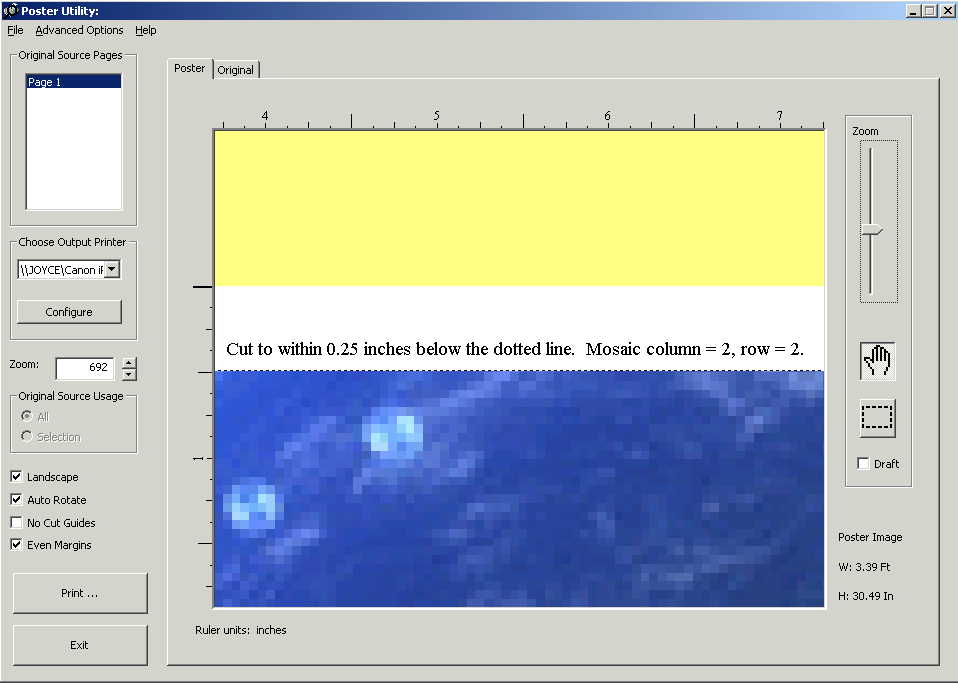
- After printing the pages of the poster out I cut
off some of the edges, as directed by guidelines as shown at the left.
On
this guide, the text "Mosaic column 2 row 1" told me where this pages
should be placed when I lay out the pages for the poster in columns and
rows.
I used transparent tape to assemble the completed
poster.
 The Cannon iP 4200 printer was connected across
a
network and wasn't available immediately after I had finished preparing
my poster, so I chose "Save Poster As ..." from the "File"
menu, which brought up the dialog shown to the right.
The Cannon iP 4200 printer was connected across
a
network and wasn't available immediately after I had finished preparing
my poster, so I chose "Save Poster As ..." from the "File"
menu, which brought up the dialog shown to the right.
- In the dialog, from the "Original Page" box at
the bottom I chose "Save Selection Only", to just save the dolphins
image on the original page. I named the poster
"dolphins_in_space" and then pressed "Save".
NOTE: I could also have sent this poster to others, via
email for example, if they also had the "Poster Printer" software
installed on their system (assuming this was OK with the copyright
holder for the image, of course.)
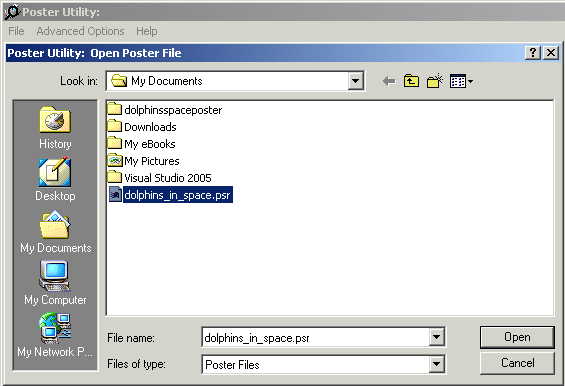
- Later when the Cannon iP 4200
printer was available, I went to the Windows "Start" menu, then to
Programs -> Poster Printer, and selected "Poster Utility".
I chose "Open Poster..." from the file menu, which brought up
the
dialog shown at the left. I selected my
"dolphins_in_space" poster, and printed as described in step 19 above